Automated Planning from Templates II: RapidPlan Optimization
- mschmidt33
- Aug 3, 2025
- 9 min read
Introduction
In a prior post, Automated Treatment Planning from Templates, we introduced a method for generating treatment plans using Varian’s Clinical Protocols and the Clinical Template Reader API. This blog post summarizes the Clinical Protocol Template and describes in detail how to customize a Clinical Protocol (or Plan template) in preparation for automated planning. With just a few lines of code, we Treated a complete VMAT plan based on predefined target selection, beam configurations, and prescriptions—all derived from a standardized protocol. This gave us a reproducible, automation-ready foundation for treatment planning.
In this follow-up, we take the next step in the automation journey: optimizing the generated plan using RapidPlan, Varian’s knowledge-based planning (KBP) system. RapidPlan leverages historical treatment data to guide objective creation via estimation of the Dose-Volume Histogram (DVH). With the OptimizeFromRapidPlanModel() method built into the Clinical Template Reader API, a trained model can be applied to generate a fully optimized plan—all from within our scripting environment.
This post will briefly review the fundamentals of RapidPlan, outline its data structure, and walk through the integration of optimization into the same application we began building in Part I. By the end, you’ll be able to generate, optimize, and prepare your plans for dose calculation—bringing you one step closer to a fully automated planning pipeline.
The code completed in part 1 is available in the ProtocolPlanner github repository. The code contributed in this post will then be available in the same repo, but within the optimization branch.
Quick Review So Far
In the first post of this series, we explored how to automatically generate a treatment plan in Eclipse using a Clinical Protocol template. The post starts with a thorough review of the XML structure of a Clinical Protocol, which includes a Structure Template, a Plan Template, and an Objective Template along with clinical goals by which to evaluate the plans. Code was then developed to consume these templates and utilize them for automated planning within the Eclipse TPS. With the help of the open-source Clinical Template Reader API, a Clinical Protocol was loaded, extracted key planning parameters—such as isocenter placement, prescription details, and beam geometry—and generated a complete VMAT plan for a selected structure set.
We also introduced a custom plugin application using the MVVM design pattern, where users could select a protocol, view plan metadata, and generate a base plan with one click. This laid the groundwork for fully scripted, standardized treatment planning using ESAPI and Varian templates. To learn more about MVVM patterns, check out a prior blog post utilizing ChatGPT to assist in application development.
Now that we’ve created a plan from a template, it’s time to take it further—by optimizing that plan with RapidPlan.
RapidPlan Overview
RapidPlan is Varian’s knowledge-based planning (KBP) system designed to enhance the quality, consistency, and efficiency of radiotherapy treatment planning. By learning from a library of high-quality, clinically approved plans, RapidPlan uses machine learning to estimate dose–volume histogram (DVH) expectations for new patients—offering personalized, data-driven guidance during optimization.
At the core of RapidPlan is a predictive engine trained on prior patient data. These models analyze geometric relationships—such as organ-at-risk (OAR) proximity and overlap with targets—and use principal component analysis techniques to forecast what DVHs are achievable. This insight is then translated into objective functions, which are applied during plan optimization.
When attempting to optimize a plan from a RapidPlan model Template in ESAPI, the CalculateDVHEstimates() method will attempt to generate the DVH estimates via the regression-based estimation from RapidPlan. This method requires 3 input parameters:
ModelId: This is the name of the model (note: This is not the model UID, but the name provided by the creator of the model).
TargetDoseLevels: A Dictionary<string,DoseValue> where the target Id from the planning structure set is the key, and the dose level is the expected prescription to cover for that specified target.
StructureMatches: A Dictionary<string,string> where the structure Id from the treatment plan is the key, and the structure Id from the RapidPlan model is the value.
Clinical experience shows that a single model structure can be made to match multiple planning structures, and that multiple planning structures can be tied to the same model structure, one can deduce that the planning structure Ids must always be the keys in the StructureMatches parameter. In short, the structures in the plan are always unique, and uniqueness is an important feature of a dictionary key.
As a developer, it can sometimes be challenging to remember what goes into these parameters. For instance, with the Structure Matches, one could confuse whether the structure Id from the planning structure set should be input into the Key or the Value parameter of the dictionary. This is where some background of having used RapidPlan in clinical practice can be helpful. If you've used RapidPlan in practice, you probably know that many RapidPlan models may have a structure that represents multiple planning structures. For example, one may generate a RapidPlan Model Structure called Femurs (R/L) to represent either the Femur_R or Femur_L. RapidPlan allows for multiple structures to be input for a model structure on model training, and it is even sometimes recommended when bilateral structures may have identical objectives and clinical goals.
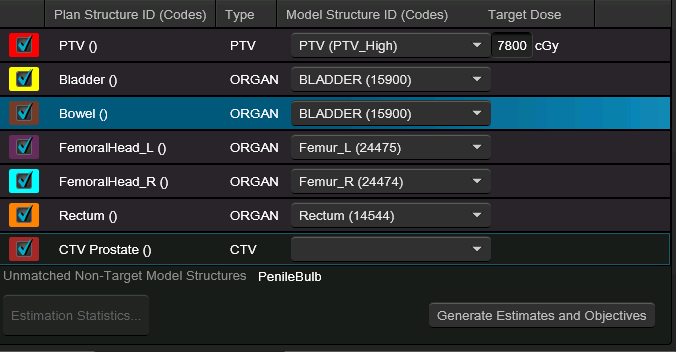
Utilizing RapidPlan works similarly. In the image below, it may be noticed that the BLADDER structure is being matched to 2 different structures in the planning structure set (ignore that the match is incorrect for the Bowel). This is a totally valid matching for DVH Estimation to run, and will not lead to any error. Clinical experience shows that a single model structure can be made to match multiple planning structures, and that multiple planning structures can be tied to the same model structure, one can deduce that the planning structure Ids must always be the keys in the StructureMatches parameter. In short, the structures in the plan are always unique, and uniqueness is an important feature of a dictionary key.
Prior to version 16.1 of ESAPI, the model ID and the model structure and targets would be required prerequisite knowledge for the developer if RapidPlan optimization was meant to be used. This became challenging in an evolving landscape where clinical users can create and modify models at any time. In version 16.1, ESAPI introduced 2 helper methods within the Calculation class.
GetDVHEstimationModelSummaries: Gets a collection of DVHEstimationModelSummary objects which include the models unique ID (uid), a model's name, treatment site, description, training status, publishing status, and more.
GetDVHEstimationModelStructures: Returns a collection of DVHEstimationModelStructure which contains the Structure Type, Id, and other details related to the structure.
With these new methods, developers can query directly to the database the required parameters to perform RapidPlan optimization. If the RapidPlan model structure Ids do not match exactly the planning structure Ids, then the developer may need to think through some custom matching to most intelligently determine the structure and target matches. The Clinical Template Reader attempts to assist developers in this process through the OptimizeFromRapidPlanModel() method, by using these new methods and attempting to match structures first on Id, and then on the Structure Code.
Optimizing From RapidPlan
Minor changes were made to the View of the ProtocolPlanner app. This includes commenting out the ItemsControl that was intended to detail the Structure Matches in favor of a more simple TextBlock where developers can continuously give the users feedback on the process of the optimization. The Optimize and CalculateDose buttons were also commented out in favor of having this single Perform Optimization button for all optimization and dose calculation steps. Note that the ComboBox to select the RapidPlan model to show both the RapidPlan model Name and TreatmentSite parameters. It is also important to set the Mode parameter in the binding expression to OneWay. By default, bindings are able to both read and write (get and set) to the source (viewmodel property), but the Name and TreatmentSite properties are read-only, and will crash on the binding.
 <!-- RapidPlan Section -->
 <StackPanel Grid.Row="0" Grid.Column="1" Margin="10">
     <TextBlock Text="Select RapidPlan Model:" FontWeight="Bold"/>
     <ComboBox ItemsSource="{Binding RapidPlanModels}" SelectedItem="{Binding SelectedRapidPlanModel}" Width="200" Margin="0,5,0,10">
<ComboBox.ItemTemplate>
    <DataTemplate>
        <TextBlock>
            <Run Text="{Binding Name, Mode=OneWay}"/>
			<Run Text=" - "/>
            <Run Text="{Binding TreatmentSite, Mode=OneWay}"/>
        </TextBlock>
    </DataTemplate>
</ComboBox.ItemTemplate>

     <!--<TextBlock Text="Structure Matches:" FontWeight="Bold"/>
     <ItemsControl ItemsSource="{Binding StructureMatches}" Margin="0,5,0,10">
         <ItemsControl.ItemTemplate>
             <DataTemplate>
                 <TextBlock Text="{Binding StructureName}"/>
             </DataTemplate>
         </ItemsControl.ItemTemplate>
     </ItemsControl>-->

     <Button Content="Perform Optimization" Command="{Binding OptimizeCommand}" Width="200" Margin="0,5,0,10"/>
     <ScrollViewer Height="200">
         <TextBlock Text="{Binding CalculationLog}" TextWrapping="Wrap"/>
     </ScrollViewer>
 </StackPanel>
The ViewModel was updated to include definitions for the objects needed to select and calculate the optimization from RapidPlan (see RapidPlanModels, SelectedRapidPlanModel, OptimizeCommand, and CalculationLog). Also please note the modifications to the constructor to instantiate Lists, RelayCommands, and a method generated to fill the RapidPlan lists.
        public List<DVHEstimationModelSummary> RapidPlanModels { get; private set; }
        private DVHEstimationModelSummary _selectedRapidPlanModel;

        public DVHEstimationModelSummary SelectedRapidPlanModel
        {
            get { return _selectedRapidPlanModel; }
            set {
                SetProperty(ref _selectedRapidPlanModel,value);
                OptimizeCommand.RaiseCanExecuteChanged();
            }
        }
        public RelayCommand OptimizeCommand { get; private set; }
        private string _calculationLog;

        public string CalculationLog
        {
            get { return _calculationLog; }
            set { SetProperty(ref _calculationLog,value); }
        }
		public ExternalPlanSetup AutoPlan {get; set;}

        //constructor
        public MainViewModel(ScriptContext context, ClinicalTemplate clinicalTemplate)
        {
            _context = context;
            _clinicalProtocols = clinicalTemplate;
ClinicalProtocols = new List<Protocol>();
            RapidPlanModels = new List<DVHEstimationModelSummary>();
            GetClinicalProtocols();
            GetRapidPlanModels();
            GeneratePlanCommand = new RelayCommand(GeneratePlan, CanGeneratePlan);
            OptimizeCommand = new RelayCommand(OnOptimize, CanOptimize);
        }
Please note one additional change: There was an AutoPlan property generated just above the constructor. this property has been set as the last line of the OnGeneratePlan method with a line that simply states AutoPlan = autoPlan;.
The 3 generated methods now in the constructor should look as follows:
private void GetRapidPlanModels()
{
foreach(var model in _context.Calculation.GetDvhEstimationModelSummaries())
{
RapidPlanModels.Add(model);
}
}
private void OnOptimize(object obj)
{
CalculationLog = "Starting Optimization...";
var dvhe_response = clinicalProtocols.OptimizeFromRapidPlanModel(
context.Calculation.GetDvhEstimationModelStructures( SelectedRapidPlanModel.ModelUID),
AutoPlan,
SelectedRapidPlanModel,
null,
null,
false);//false for testing.
CalculationLog += dvhe_response;
CalculationLog += "\nOptimization Complete.";
CalculationLog += "\nCalculating Dose";
AutoPlan.CalculateDose();
CalculationLog += "\nDose Calculation Complete.";
}
private bool CanOptimize(object arg)
{
return SelectedRapidPlanModel != null;
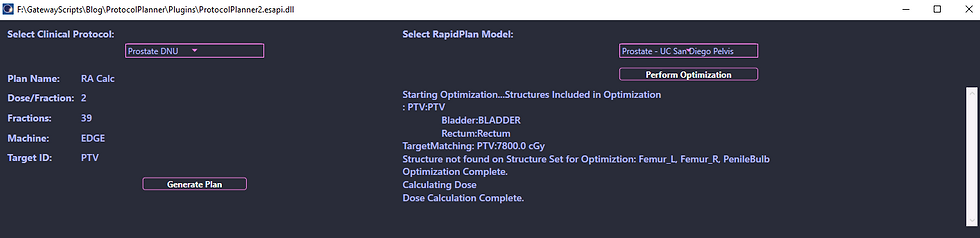
}After the successful completion of the plan, the app will provide notes on DVH Method optimization and the status of the dose calculation.
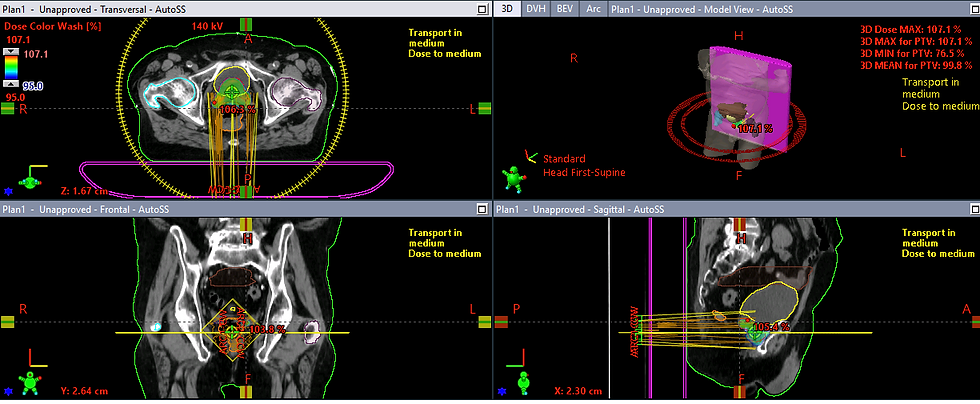
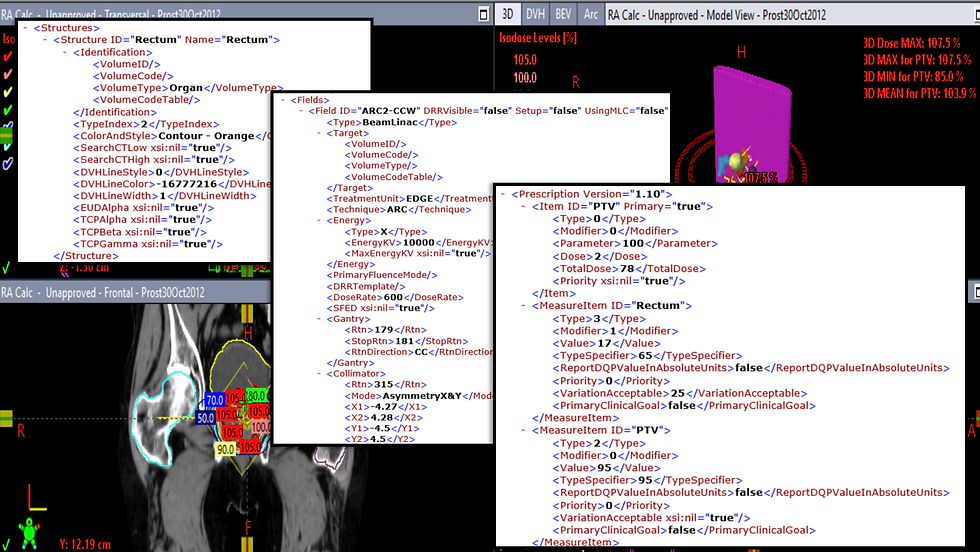
The plan in Eclipse should look as follows:
Important Note: When optimizing a plan with RapidPlan in ESAPI, the DVHEstimation model does not inherently add a Normal Tissue Objective. The Clinical Template Reader (currently in V18 only!) adds an Automatic Normal Tissue Objective with a priority of 100 by default to any optimization.

Plan Evaluation from Protocol
Now that the plan has been optimized and the dose has been calculated, it would be beneficial if the planner could evaluate the clinical goals directly in the application. This task is made easy with the CompareProtocolDoseMetrics() method. In the following code examples, we will utilize this method to display the dose evaluations using the ClinicalTemplateReader API. To begin, this code will be using the view, that was generated via AI assistance in the prior blog post. As a reminder:
            <DataGrid ItemsSource="{Binding DoseMetrics}" AutoGenerateColumns="False" Height="200" Margin="0,5,0,10">
                <DataGrid.Columns>
                    <DataGridTextColumn Header="Structure ID" Binding="{Binding StructureID}"/>
                    <DataGridTextColumn Header="Metric" Binding="{Binding Metric}"/>
                    <DataGridTextColumn Header="Tolerance" Binding="{Binding Tolerance}"/>
                    <DataGridTextColumn Header="Value" Binding="{Binding Value}"/>
                    <DataGridTextColumn Header="Evaluation" Binding="{Binding Evaluation}"/>
                </DataGrid.Columns>
            </DataGrid>
To assist this UI element, a class model can be generated to hold the properties displayed in the DataGrid columns. Add a new class to the Models folder called DoseMetricModel and add the following properties. Also note that the constructor contains some basic code to parse the model from the output of the CompareProtocolDoseMetric method.
public class MetricModel
{
    public string StructureId { get; set; }
    public string Metric { get; set; }
    public string Tolerance { get; set; }
    public string Value { get; set; }
    public string Evaluation { get; set; }
    public MetricModel(DoseMetricModel metric)
    {
        StructureId = metric.StructureId;
        switch (metric.MetricType)
        {
            case DoseMetricTypeEnum.MinDose:
                Metric = "Dmin";
                break;
            case DoseMetricTypeEnum.MaxDose:
                Metric = "Dmax";
                break;
            case DoseMetricTypeEnum.MeanDose:
                Metric = "Dmean";
                break;
            case DoseMetricTypeEnum.DoseAtVolume:
                Metric = $"D{metric.InputValue} {metric.InputUnit}";
                break;
            case DoseMetricTypeEnum.VolumeAtDose:
                Metric = $"V{metric.InputValue} {metric.InputUnit}";
                break;
            default:
                Metric = "Not currently implemented";
                break;
        }
        Tolerance = $"{metric.TargetValue} {metric.TargetUnit}";
        Value = $"{metric.ResultValue} {metric.ResultUnit}";
        Evaluation = metric.Pass.ToString();
   }
}
Finally, we will add a MetricModel collection to our code. For this task, an ObservableCollection object is appropriate as the ObservableCollection inherits from INotifyPropertyChanged when Items in the collection are added, removed, or cleared. Generate the collection as follows:
public ObservableCollection<MetricModel> DoseMetrics { get; private set; }and be sure to instantiate the collection from within the constructor.
DoseMetrics = new ObservableCollection<MetricModel>();Lastly, in the method OnOptimize method, the ClinicalTemplateReader API can efficiently parse the metrics from the Clinical Protocol using a relatively short number of lines of code.
CalculationLog += "\nComparing Dose Metrics to Clinical Protocol.";
var doseMetrics = _clinicalProtocols.CompareProtocolDoseMetrics(AutoPlan, SelectedClinicalProtocol);
foreach(var metric in doseMetrics)
{
DoseMetrics.Add(new MetricModel(metric));
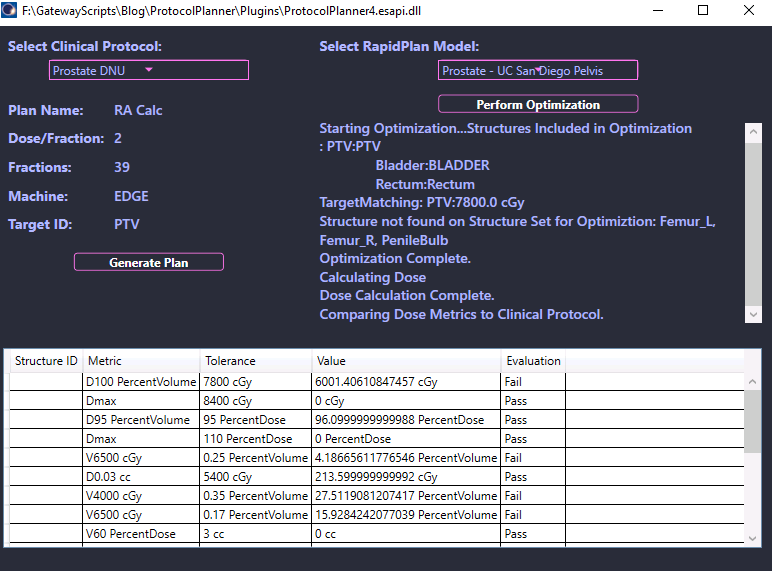
}As can be seen below, the application can appropriately display which metrics are passing vs metrics that are not being met. Please note, the ClinicalTemplateReader API does not support calculations to Gradient Measure or Conformity Index at this time.
Cleaning Up
Prior to pushing this application to the public repository, there are a few items of note we can improve.
Clean up units - Write % instead of PercentVolume or PercentDose.
Result precision - Limit value to 2 decimal places.
Color coding - Color code evaluations for quick review.
Result values can be limited to 2 decimal places directly in the MetricModel class when writing the Value property. Also in the MetricModel class every time the code has a listed unit (i.e. TargetUnit, InputUnit, ResultUnit, etc.), instead write the unit designation as follows.
Value = $"{metric.ResultValue:F2} {(metric.ResultUnit.ToString().Contains("Percent") ? "%" : metric.ResultUnit.ToString())}";Color coding can also be accomplished by using some RowStyle formatting for the DataGrid. Below is an example of formatting colors based on the Evaluation value from the Metric Model. These small changes improve the usability of the application.
<!-- RowStyle for conditional formatting -->
<DataGrid.RowStyle>
    <Style TargetType="DataGridRow">
        <Style.Triggers>
            <!-- Example: Set background to Green if Evaluation is "Pass" -->
            <DataTrigger Binding="{Binding Evaluation}" Value="Pass">
                <Setter Property="Background" Value="LightGreen"/>
            </DataTrigger>

            <!-- Example: Set background to Red if Evaluation is "Fail" -->
            <DataTrigger Binding="{Binding Evaluation}" Value="Fail">
                <Setter Property="Background" Value="LightCoral"/>
            </DataTrigger>

           <!-- Example: Set background to Yellow if Evaluation is "Warning" -->
            <DataTrigger Binding="{Binding Evaluation}" Value="Warning">
                <Setter Property="Background" Value="LightYellow"/>
            </DataTrigger>
        </Style.Triggers>
    </Style>
</DataGrid.RowStyle>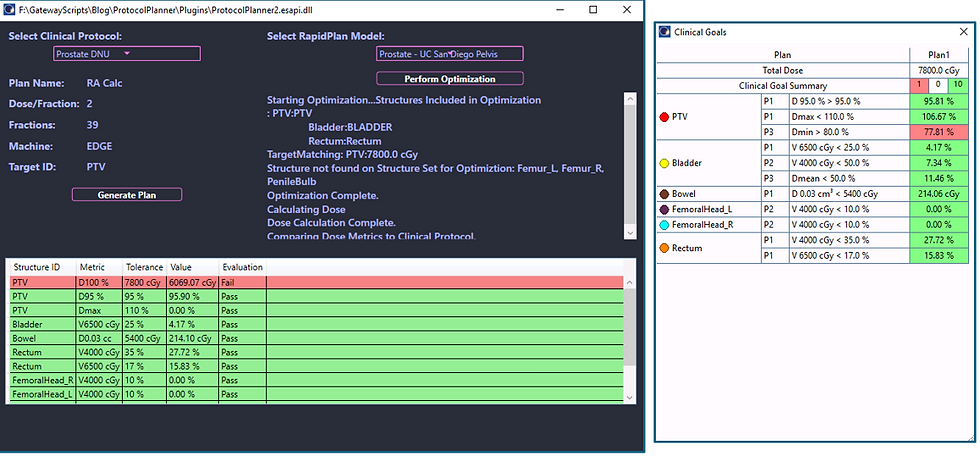
Conclusion
With this second installment in our Automated Planning from Templates series, we've taken a major step forward in building a fully automated treatment planning pipeline. By integrating RapidPlan optimization into our existing MVVM-based application, we’re now able to generate, optimize, and calculate dose for a treatment plan—all without manual intervention. The combination of Clinical Protocols, the Clinical Template Reader API, and knowledge-based planning through RapidPlan brings us closer to consistent, reproducible, and efficient plan generation across patients and disease sites.
That said, our current implementation highlights an important challenge in clinical automation: responsiveness. Because the optimization and dose calculation steps are performed on the UI thread, users may notice the application becoming temporarily unresponsive during those operations. This is expected behavior in a single-threaded environment—and a critical area for improvement.
In our next and final post of the series, we’ll address this issue by refactoring the application into a multi-threaded automated planning tool, enabling real-time feedback and a smoother user experience during long-running operations like optimization and dose calculation.
Until then, feel free to explore the ProtocolPlanner GitHub repository to review the optimization branch, experiment with your own RapidPlan models, and continue refining your scripting skills with the Clinical Template Reader.


Comments